
Ubuntu 18.04 LTS has officially launched and most people have decided to switch to the newest version on their servers and home desktops. We’ll show you how to upgrade your Ubuntu server to Ubuntu 18.04 via the command line.
IMPORTANT – BEFORE WE BEGIN
Backup your server before upgrading!
By upgrading you’re at risk of losing valuable data. Issues with your server and the services on your server may arise. Anything is possible! So please, before doing anything, backup everything!
Start fresh if you can.
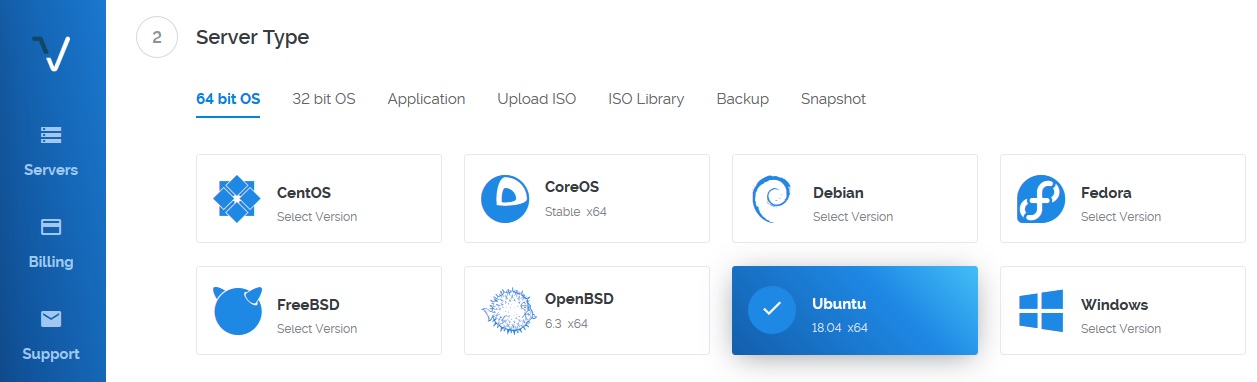
It’s best to “start fresh” with a clean install of Ubuntu 18.04. Most cloud hosting providers already have an Ubuntu 18.04 server image ready to deploy, so you can start fresh with 18.04 with a couple of clicks and migrate your data later on. Which is usually preferred by many instead of upgrading.
For example, you can deploy a new Vultr server with Ubuntu 18.04:
You can even create a snapshot of your current server and upgrade to 18.04 on a copy.
You’ll need root access.
So use the root user or a sudo user to perform all the actions below.
Now that we got all the warnings out of the way, let’s move onto the actual tutorial:
How to upgrade your Ubuntu (16.04, 17.10) server to Ubuntu 18.04 LTS
If you’re using Ubuntu 14.04 and follow the steps below, you’ll actually upgrade to 16.04.
If you’re using 16.04, follow the steps below and you’ll upgrade to Ubuntu 18.04 LTS. These instructions are intended for a server, but you can still use them on your Desktop via Terminal.
Again, before we begin, note that you cannot downgrade afterward. So please backup your data before going further.
1. Update your current packages
First, you need to update the packages on your current server by running the following commands:
apt-get update && apt-get upgrade -y
Run the following command:
apt-get dist-upgrade -y
To update all packages, which will add or remove packages and take care of dependencies.
2. Upgrade to 18.04 LTS
Although you can manually upgrade your server, many people prefer the “do-release-upgrade” tool which is provided by Ubuntu by default. The tool does everything automatically.
So run the following command:
do-release-upgrade
And closely follow all the prompts.
As of writing this tutorial, Ubuntu 18.04 LTS server is still in development, so you’ll need to run the following command instead:
do-release-upgrade -d
Answer “y” where needed to continue. You’ll be asked stuff like:
- If you want to continue upgrading via SSH. You’re at risk of losing your connection to the SSH server. An additional SSH daemon will be started at port 1022 if you continue. You may need to update your firewall and open the 1022 port.
- Some packages may be updated or removed. Some packages may no longer be supported. If you have any custom configs on your old setup, make sure you inspect the details of the packages that need updating during this process.

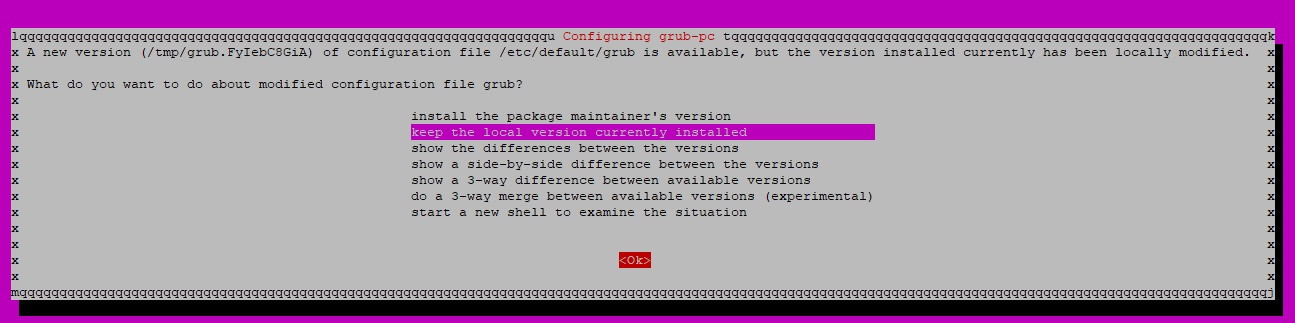
- You’ll be asked whether to keep the old configuration or use a new default one for some packages. It’s best to keep the old one, but you still need to test it afterward. Example: grub

And more. So read every prompt and decide the best action for your setup.
If anything goes wrong, either use the backup and restore your server or access the server via a KVM console if your hosting provider has one.
After you go through all the prompts, the upgrade is completed and you’ll need to restart your server. You’ll get the following message:
System upgrade is complete.

Restart required

To finish the upgrade, a restart is required.
If you select 'y' the system will be restarted.
Restart your server and log back in. You should be greeted with the following message:
Welcome to Ubuntu 18.04 LTS (GNU/Linux 4.15.0-20-generic x86_64)
You can also run the “lsb_release -a” command to check what version you’re currently running.
And that’s it! You’re done.
What’s New in Ubuntu 18.04 LTS Server
You can check our Ubuntu 18.04 article to find out what’s new in the Desktop version or in general, but here’s what’s new in 18.04 related to the server version and common services:
- 4.15 Kernel
- systemd 237
- LXD 3.0
- Node.js 8.10
- Apache 2.4.29
- nginx 1.14.0
- PHP 7.2 (some PHP applications may not work on PHP 7.2)
- MySQL 5.7.21
- MariaDB 10.1
- MongoDB 3.6.3
- PostgreSQL 10
There are more updates, but these are the major ones. So make sure the applications you are using support these versions. Especially PHP as quite a lot of WordPress plugins have compatibility issues with PHP 7.2.


2 thoughts on “How to Upgrade Your Server to Ubuntu 18.04 LTS”
Direct upgrades from 16.04 to 18.04 LTS will come only with the first point release, in late July. Nobody should use `do-release-upgrade` yet!
Right. That’s why IF someone wants to upgrade now, they can do it with the -d option. It’s good if you want to test things beforehand.