
Follow the instructions below to install WordPress on an Ubuntu 22.04 server with a LEMP (Nginx, MariaDB, PHP) stack and a free SSL certificate (HTTPS) by Let’s Encrypt.
Tutorial Steps:
- Update the server
- Install Nginx
- Install MariaDB
- Install PHP
- Configure PHP
- Create a database
- Download WordPress
- Configure Nginx
- Configure WordPress
- Install and configure a free SSL certificate (HTTPS)
- Finish installing WordPress
What To Do Next
FAQs and Troubleshooting
WordPress on Ubuntu – Requirements
Let’s start with the requirements. You don’t need much.
- An Ubuntu 22.04 server. You can buy one for $5 (1GB RAM) at Vultr. You can directly deploy Ubuntu 22.04 at Vultr
- You need root access to the server. You do get root access with Vultr and other unmanaged cloud hosting providers. Note that some managed VPS providers won’t give you root access to the server, but they’ll install WordPress for you anyway. All commands below should be executed by the root user or with sudo.
- A LEMP (Linux, Nginx, MariaDB, PHP) stack. We’ll show you how to install this stack below.
- An SSH client so you can connect to your server.
- WordPress itself doesn’t have any special requirements. We recommend at least 1GB RAM. If your site is smaller and has fewer visitors you can get less.
Before we go on, these instructions are for people that plan on installing and managing a WordPress server themselves. If you don’t know how to manage a server, get managed WordPress hosting and skip this tutorial.
If you want to use CentOS you can check our Centmin Mod tutorial.
How to Install WordPress with Nginx, MariaDB, PHP 8, and a free SSL on Ubuntu 22.04
The instructions below will work on other versions of Ubuntu, including 18.04 and 16.04, but these are specifically written for 22.04.
1. Update the server
Before doing anything, you should update your server and its packages with the following commands:
apt-get update && apt-get upgrade -y
2. Install Nginx
To install Nginx on Ubuntu 22.04, run the following command:
apt-get install nginx -y
Check if Nginx is installed with:
nginx -v
Which should give you an output similar to this:
nginx version: nginx/1.18.0 (Ubuntu)
If you use a firewall you’ll need to add a rule to allow Nginx.
3. Install MariaDB
MariaDB is pretty much the same with MySQL, so don’t get confused by the name. To install MariaDB, run the following command:
apt-get install mariadb-server -y
To check if it’s installed, log into your MariaDB server by running:
mysql
If you can log in it’s installed. You should get the specific MariaDB version you’re running in the welcome message:
Server version: 10.3.32-MariaDB-0ubuntu0.22.04.1 Ubuntu 22.04
Exit out of the database server by running:
exit;
You should run the following script to secure and configure your database server:
mysql_secure_installation
And follow the prompts. Use a strong password. You can enter Y (the default) for all prompts.
4. Install PHP
this section was updated
Ubuntu 22.04 uses PHP 8 by default. That version is outdated and you should upgrade to PHP 8.0 or 8.1 ASAP. Follow our tutorial here on how to install PHP 8.
Depending on what version of Ubuntu you’re using, the commands below might install PHP 8.
To install PHP with all its dependencies and needed modules, run the following commands:
apt-get install php-fpm php-curl php-intl php-mysql php-gd php-mbstring php-xml php-imagick php-zip php-xmlrpc -y
Check if PHP is installed with:
php -v
Which should give you an output similar to this:
PHP 8.1.1 (cli) (built: Dec 31 2021 07:26:20) (NTS)
That’s it. The LEMP stack is installed. Let’s move on.
5. Configure PHP
First, start by editing the php.ini file.
We’ll use the Nano text editor (which is the easiest for beginners). After you edit something with Nano, hit “CTRL + X”, then Y, and Press enter to save the changes. You can search the file with “CTRL + W”.
So open the file:
nano /etc/php/8.1/fpm/php.ini
And search for this line:
;cgi.fix_pathinfo=1
Uncomment the line by removing the ; and update it to 0:
cgi.fix_pathinfo=0
Find all the following lines in the php.ini file and update them accordingly:
upload_max_filesize = 500M
post_max_size = 2000M
memory_limit = 2000M
max_execution_time = 120
You can use different values depending on your server.
6. Create a database
First, log in to your MariaDB server with the password you set earlier:
mysql -u root -p
And create a database for your WordPress by running these commands:
CREATE DATABASE wordpress;
CREATE USER 'wpuser'@'localhost' IDENTIFIED BY 'EnterStrongPassword';
GRANT ALL ON wordpress.* TO 'wpuser'@'localhost';
FLUSH PRIVILEGES;
exit;
With these commands, you’ll create a database and a user and grant permissions to the user. You can use your own names instead of these. Remember to use a strong password.
7. Download WordPress
Start by navigating to the directory where you want to download WordPress. We’ll use Nginx’s default directory:
cd /var/www/html
And download the latest version:
wget https://wordpress.org/latest.tar.gz
Extract the archive in the directory you’re currently in:
tar -zxvf latest.tar.gz --strip-components=1
Remove the archive:
rm -f latest.tar.gz
And update permissions:
chown -R www-data:www-data /var/www/html/
chmod -R 755 /var/www/html/
8. Configure Nginx
First, create an Nginx configuration file:
nano /etc/nginx/sites-available/example.com
And paste the following (after updating example.com to your domain)
server {
    listen 80;
    listen [::]:80;
    root /var/www/html;
    index  index.php index.html index.htm;
    server_name  example.com www.example.com;

    client_max_body_size 500M;

    location / {
        try_files $uri $uri/ /index.php?$args;
    }

    location = /favicon.ico {
        log_not_found off;
        access_log off;
    }

    location ~* \.(js|css|png|jpg|jpeg|gif|ico)$ {
        expires max;
        log_not_found off;
    }

    location = /robots.txt {
        allow all;
        log_not_found off;
        access_log off;
    }

    location ~ \.php$ {
         include snippets/fastcgi-php.conf;
         fastcgi_pass unix:/var/run/php/php8.1-fpm.sock;
         fastcgi_param SCRIPT_FILENAME $document_root$fastcgi_script_name;
         include fastcgi_params;
    }
}
And enable the configuration file:
ln -s /etc/nginx/sites-available/example.com /etc/nginx/sites-enabled/
Disable the default configuration file if you’re not using it:
rm -f /etc/nginx/sites-enabled/default
Run the following command to test and see if everything’s ok with Nginx:
nginx -t
Now restart Nginx and PHP-FPM for the changes to take effect
systemctl restart nginx.service
systemctl restart php8.1-fpm.service
9. Configure WordPress
There’s a default wp-config file that we need to edit. So first rename the file:
mv /var/www/html/wp-config-sample.php /var/www/html/wp-config.php
Open it:
nano /var/www/html/wp-config.php
And update the following lines with your database information:
define('DB_NAME', 'wordpress');
define('DB_USER', 'wpuser');
define('DB_PASSWORD', 'EnterYourDatabasePassword');
Save and close the file.
For security reasons, you should update the security keys in your wp-config file.
First, go here to generate them.
Open the wp-config.php file again:
nano /var/www/html/wp-config.php
And update the following lines with the ones you generated:
define('AUTH_KEY', 'put your unique phrase here');
define('SECURE_AUTH_KEY', 'put your unique phrase here');
define('LOGGED_IN_KEY', 'put your unique phrase here');
define('NONCE_KEY', 'put your unique phrase here');
define('AUTH_SALT', 'put your unique phrase here');
define('SECURE_AUTH_SALT', 'put your unique phrase here');
define('LOGGED_IN_SALT', 'put your unique phrase here');
define('NONCE_SALT', 'put your unique phrase here');
Save and close the file.
You can be done here if you don’t plan on using HTTPS, but we’ll show you how to set up a free SSL certificate from Let’s Encrypt.
10. Install and configure a free SSL certificate (HTTPS)
We’ll use Let’s Encrypt and the certbot for automatic installation and configuration.
First, install the certbot:
apt-get install python3-certbot-nginx -y
Then install a certificate for your domain:
certbot --nginx -m info@example.com -d example.com -d www.example.com
At the prompts, agree to the Terms and Conditions by entering “a” and then optionally subscribe to ETF with “y”.
IMPORTANT: the certbot will ask you whether to redirect all traffic to HTTPS (option 2) or not (option 1), you need to choose option 2. So enter 2.
The certbot will automatically update your Nginx configuration file. A Let’s Encrypt certificate lasts 90 days by default. You’ll be notified before it expires, so you can renew it.
To renew your certificate manually, run:
certbot renew
To automatically update your certificate, set up a cron job by running:
crontab -e
And adding the following line:
0 1 * * * /usr/bin/certbot renew & > /dev/null
Which will automatically renew your certificate every 30 days.
11. Finish installing WordPress
Navigate to https://example.com and follow the steps to finish installing WordPress.
First, you’ll need to choose a language.
Then, you’ll need to enter site information such as title, username, password etc.
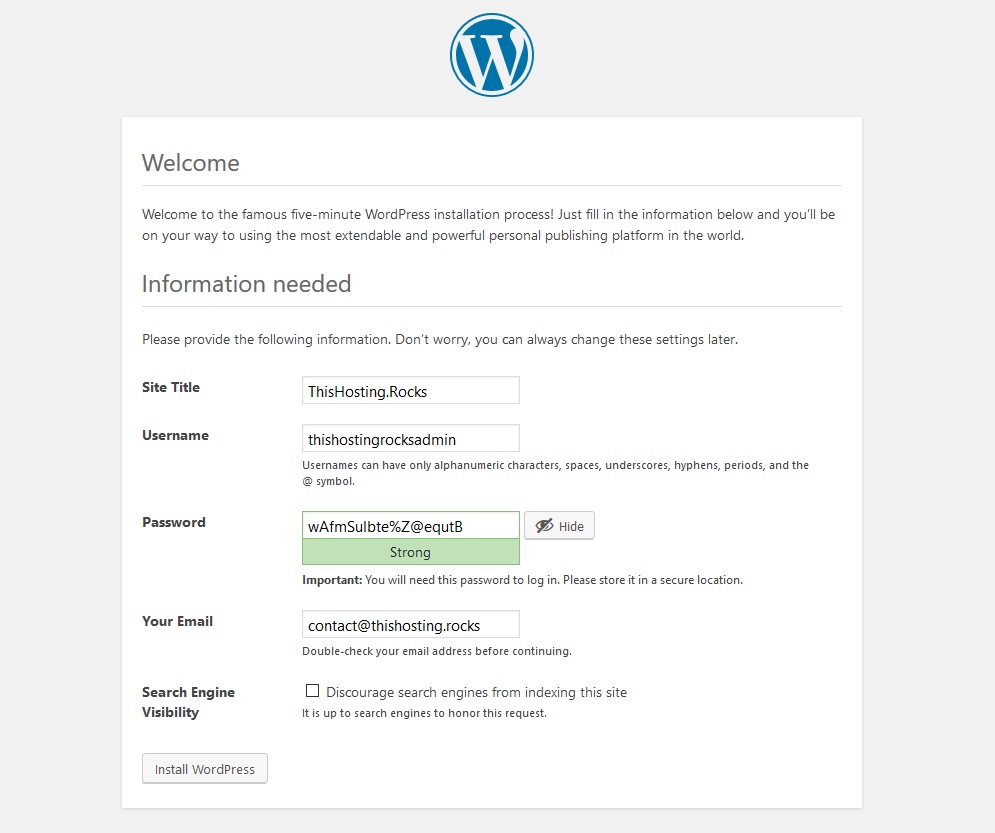
Click on ‘Install WordPress’ and that’s it! You’re done. You’ve successfully installed WordPress on Ubuntu 22.04 with Nginx, PHP 8.1, MariaDB, and Let’s Encrypt SSL (HTTPS).
What To Do Next After Installing WordPress on Ubuntu
Here’s what you should do next:
- You’re using an Ubuntu server so you’ll need to look into securing and optimizing your server. There are lots of tutorials online with step-by-step instructions for beginners on how to secure your Ubuntu server. So follow them.
- You’ll also need to keep your server updated or get a Linux server management plan and they’ll take care of your server for you.
- You should also set up some sort of caching. There are many options out there, so choose what works best for your site and your server. Redis cache is pretty easy to set up on Ubuntu and WordPress. Not recommended for beginners.
- Optimize services running on your server – including the LEMP stack. Again, lots of tutorials online.
WordPress Installation FAQs and Troubleshooting
Some frequently asked questions (with answers!) and common issues related to installing WordPress on Ubuntu:
Do I have to use HTTPS?
No, but it’s definitely recommended since it’s free and easy to set up anyway. If you don’t plan on using an SSL certificate you can just skip step 10.
I get an “Error establishing a database connection” error
It can be caused by many things, but it’s most probably an error in your wp-config.php file. Make sure you’re using the right information (user, password etc.)
Where’s the .htaccess file?
We used Nginx so there’s no .htaccess file. This can be confusing for a beginner since many tutorials include instructions for Apache by default. The “.htaccess of Nginx” is the “/etc/nginx/sites-available/example.com” file you created earlier. Note that you cannot use the same .htaccess code in your Nginx configuration file.
Can I install a control panel?
Better not. You already installed everything manually. You don’t really need it anyway. If you do plan on using a control panel then it’s better if you start fresh and don’t follow this tutorial at all.
Why should I install WordPress myself when hosts offer it pre-installed or with a 1-click installer?
It offers you more control over everything. You decide what you use and how you use it. There’s always an option to just get WordPress cloud hosting without having to install or do anything yourself, but where’s the fun in that? 🙂
Can I use a tool like EasyEngine?
Sure you can! And the process is way easier – you’ll install everything in this tutorial (and more) with a single command if you use a tool like EasyEngine or Centmin Mod.
Will this tutorial work on other Ubuntu versions?
Yes, the instructions are almost exactly the same for all Ubuntu versions, including Ubuntu 18.04.
I can’t install WordPress myself! Can you help me out?
Feel free to leave a comment below if you’re stuck somewhere. If you want extensive work done on your server then you can contact us here.
Any other questions? Comment below.
Please closely follow our tutorial and make sure you read everything. If you have any questions or got any errors feel free to comment below.


33 thoughts on “Install WordPress on Ubuntu 22.04”
Oh, it’s nice to see that finally php 7.2 comes with ubuntu 18. In ubuntu 14 I had to add all those custom repo’s just to get it going.
The tutorial is easy to follow, what I would suggest is added memcached: sudo apt-get install memcached
Having a caching system as well will speedup the wordpress, plus a plugin to connect to the memcached layer.
Having a caching system would be great but I wouldn’t recommend it to a beginner. Lots of things to misconfigure. Also, cache doesn’t always play nice with some themes.
How to login to phpmyadmin bro!
We don’t have instructions on how to install phpmyadmin in this tutorial. Either look for a tutorial online and install it or just login directly to MariaDB by using the
command
command line in 18.04 is different? None of your provided code works… unable to do this… unable to locate that… wtf?
This tutorial rocks!
I configured my wordpress site on a cloud server running ubuntu 18.04 with no faults. I still need to see upload and linking to media files work, but why shouldn’t it 🙂
Installing in the root of the webserver /var/www/html shaked me a bit, but it sure is a way to keep it simple. Create another server in your cloud for other web sites, I guess.
Thanks a lot!
Hello. i have followed the guide. just without the ssl because i want to test it before going live.
so i’m having trouble with actually showing the wordpress site. right now it just says Welcome to nginx! so somewhere i must have done something wrong.
It’s something with the Nginx conf. Double check it and make sure everything is set up correctly. Or you can paste it here
can added mail system
Wow, what a great tutorial. Thank you to the moon and back.
Usually, following these type of tutorials I get some challenges right away… Here, it’s so precise and also you printed output that we should expect. Applauds!
Since I’m a noobbie on Ubuntu, I got only one error on this line: chmod -R 755 mydomain.com but it still doesn’t want to work…. I’m hosting on Azure, opened up ports 80,443 so it should work. Tried with http and https… mhm, do you guys have an idea (and yes, I tried with IP only), it says, welcome to gnix server. WordPress files exist there, so I tried this combo too: IP/install.php or IP/wordpress
great stuff, love nginx.
ps, typo: missing space:
And enable the configuration file:
ln -s /etc/nginx/sites-available/example.com/etc/nginx/sites-enabled/
sb: (see space missing) bad me for copy/paste. did strange things.
And enable the configuration file:
ln -s /etc/nginx/sites-available/example.com /etc/nginx/sites-enabled/
Updated, thanks
Thanks for the documentation. It is clear and concise. There are a few problem:
1. apt-get upgrade && apt-get upgrade -y << apt-get update should run first, and not upgrade twice.
2. ln -s /etc/nginx/sites-available/example.com/ /etc/nginx/sites-enabled/ << ln -s /etc/nginx/sites-available/example.com should be a file hence there should be no trailing slash.
Thanks, updated
In additional, remove the default sym link provided by nginx, else it gets redirected to the nginx successful page.
sudo rm -f /etc/nginx/sites-enabled/default
Hi,
great tutorial, thanks! I’m setting up WordPress on an old PC running Ubuntu 18.04 here at home, in order to learn and play with it.
Being a total newbie I probably missed something. At a certain point you write “And paste the following (after updating example.com to your domain)”. What am I supposed to do here? I do not own a domain, so I just left example.com, and now, having worked through the tutorial, when I open https://example.com, well, of course it opens https://example.com/, which is an existing domain out there in the Internet.
How can I fix this?
Thanks & BR
Mark
If I remember correctly, the default Nginx configuration file is set up for localhost. You basically need to use “localhost” or “127.0.0.1” instead of example.com
You can also edit your local hosts file and resolve example.com to your computer https://www.linode.com/docs/networking/dns/using-your-systems-hosts-file/
You basically would need to add this line
127.0.0.1 example.comto your/etc/hostsfile and example.com will point to your localhostHi,
Greetings. I found this tutorial very helpful. I have one question, if setup whole wordpress on vultr IP address and migrate/restore my old data with plugin and change A record after running this I mean when all complete. Is it possible? I will using all in one migration plugin. I never tested this before.
regards
If you set up your site and configured Nginx for your IP then you’d need to configure nginx too after the migration with the plugin. The plugin will migrate and update all settings, but the plugin can’t change your nginx conf as far as I know.
Thanks a lot ………so it looks I must test this before migrating my site? Anyway Thanks a lot I found this website very helpful. Really helpful 😉
regards
WordPress is requesting installation with PHP 7.3, could you do a complete tutorial like this using this version? I searched all over the internet and I couldn’t do it, thanks for the excellent content.
Sure, but the instructions are pretty similar. You can follow this guide to install 7.3 or upgrade to it: https://thishosting.rocks/install-php-on-ubuntu/
I had already seen this article and tried to install PHP 7.3 through this tutorial too, but there were some errors and the installation was not done. That’s because I use NGINX server and I was unable to install it, even with the answer given by you in a comment. 🙁
In the PHP part, I would add php-imagick & php-zip to the command as it is required by WordPress in the Health Status. Other than that, it is a fantastic tutorial!
Added. Thanks
You rock! Thank you!
Step 6:
Wrong: CREATE USER `wpuser`@`localhost` IDENTIFIED BY ‘EnterStrongPassword’;
Right: CREATE USER ‘wpuser’@’localhost’ IDENTIFIED BY ‘EnterStrongPassword’;
and
Wrong: GRANT ALL ON wordpress.* TO `wpuser`@`localhost`;
Right: GRANT ALL ON wordpress.* TO ‘wpuser’@’localhost’;
It is hard to see but you are using ` instead of ‘
Step 10:
Wrong: apt-get install python-certbot-nginx -y
Right: apt-get install python3-certbot-nginx -y
Updated. Thanks!
Hi bro,
Your instruction is very helpful, but my Nginx service not work.
“nginx.service: Failed with result ‘exit-code'”
I can not continue with this error.
IS step 8 and 10 important for hosting a website on ubuntu server if i have not purched domain and ssl .
Step 8 is mandatory even if not using HTTPS(443). Step 10, It depends. If your intent is to use http (80) only, skip Step 10. If your intent is to use a self-signed certificate, skip Step 10 but you will have to edit your example.com.conf file under /etc/nginx/sites-available/ then add the “listen 443 ssl” block (and probably add a redirect http to https in the “listen 80” block). Don’t forget adding the path to your certificates in the 443 block as well.
Hey brother, it’s been a while since my last post. So, would you mind adding php-intl to the php install command line, please? It is not mandatory but there is always a warning about this in the WordPress Site Health. Thanks!
done, thanks